Sketchup is a complete design 3D software originally released in 2000 by the start-up company Software. In 2006 the tech giant Google acquired the license of the software after a successful collaboration made it possible for users to insert 3D models in Google Earth.
Finally, in 2012, Sketchup became part of the development company Trimble. Throughout the years, Sketchup has evolved thanks to all the improvements provided by these companies. The reason it’s such a powerful software is that it was originally created for the Architecture, Design, and Filmmaking industries.
However, its main purpose has always been to make 3D modeling accessible to everyone.
This explains why the program is so intuitive and has such an easy learning curve. Sketchup has two versions of the software: a Free online-based version that runs directly in a web browser and a Pro desktop version, which you can purchase and download onto your computer.
Sketchup has its own native tools, which are the essence of its simplicity. They allow you to navigate, create, and edit a 3D model, but it also has additional plugins and extensions. These plugins can help us execute a specific task that native tools are less capable of.
Let’s start by listing the most important edit Sketchup tools first, the ones that make Sketchup so unique.
Sketchup has a lot of editing tools and each one of them are indispensable resources when you are trying to achieve certain results. Here we list the most relevant:
- Push Pull
- Scale
- Move
- Rotate
- Offset
- Follow Me
Note: Moving and rotating objects in Sketchup are the most common manipulations we can do to objects. This article will show us the various ways we can rotate objects, and show a few shortcuts as well.
Rotating objects is one of the fundamental tasks we perform while 3D modeling. In the spirit of simplicity, Sketchup comes with one tool for this task; the Rotate tool. But this one tool has many hidden features that can give us all the functionality we would ever need to manipulate objects in Sketchup.
We can even have the ability to rotate objects without using the Rotate tool.
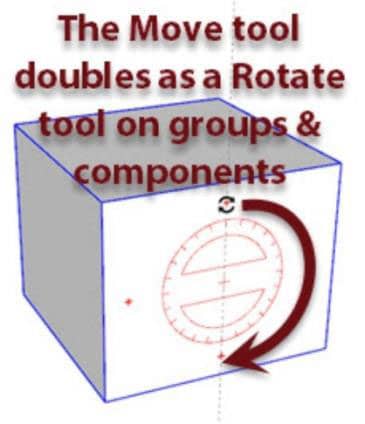
There’s a really handy shortcut for rotating groups and components using the Move tool. If we think about it, if we need to rotate an object, we have probably moving it into position as well, so it’s really convenient to not have to switch tools if we don’t have to.
- With the Select tool (Spacebar), select the group or component we did like to rotate.
- With a group or component selected (it should be highlighted blue), activate the Move tool by pressing (M) on our keyboard.
- If we hover over the object with the Move tool, we will notice a set of red crosshairs appear. Click and drag any of these crosshairs to rotate the object.

Rotating objects in this way will rotate them around their centre point. If it is needed more control over how the object is rotated, we would need to use the Rotate tool.
How to use rotate tool in Sketchup
Method 1 of 2:
Rotate a Plane
Step 1: Open Sketchup and create an object to use the Rotate tool on. Click on the Rotate tool icon and look at the screen.
Step 2 : Click once on the object to rotate. In this instance, it is on the square.
Step 3 : Pull out away from the object at the location we want to be ‘Zero’. What that means is that the object will move a certain number of degrees from the line you choose.
Step 4: Click on the location where we want it to be or type in the degree we want. Here is a completed 45 degree rotation.
Method 2 of 2:
Rotate a Cube
Step 1 : Create a cube to move around.
Step 2 : Triple click the cube (since we are going to be moving the cube).
Step 3 : Select where we want to rotate from.
Step 4 : Watch the Axes. The colour of the protractor is the same colour of the axis that we will be rotating around.
Step 5 : Understand that the first click is the centre of the axis, second click is the angle of the move. Neither of them have to be on the subject that is selected for moving.


