

In this article, you will learn to use the various options within the SketchUp Styles toolbar to make visual effects like X-Ray mode, hidden line styles, and more. One of the toolbars that come with SketchUp allows you to quickly change the design settings of your SketchUp model, and it doesn’t really get talked about all that much. It’s called the styles toolbar.
Model Credit
Model Credit apartment house by Paulwall. Note that this toolbar allows you to modify between pre-set styles. If you would like to make a custom style that adjusts the way your model looks.
When you check out this toolbar, there are basically two sections in it.
- First, there are two boxes to the left of a touchline. This affects your ability to ascertain different edges through your faces. They will be turned on and off independently of the opposite options.
- The second section allows you to regulate your face settings, meaning the way your actual faces within SketchUp look.
X-Ray Mode
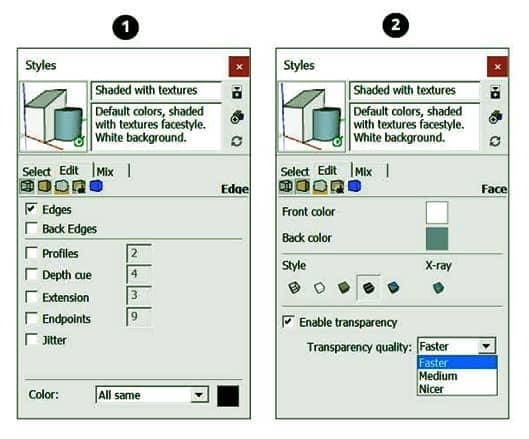
The option on the left allows you to show on X-Ray mode. It creates tons of confusion for newer users because they’ll click thereon without knowing what it does, and then they can not find out the way to change their models back to the way they were before.
You can see that once you click on this feature, it turns your faces somewhat transparent, allowing you to ascertain through your faces into your model. This will be great for looking into more complex models to ascertain what’s inside. If you would like to regulate the transparency of your model, you’ll do so by going into your styles section, within the faces tab, and changing your transparency quality to “nicer,” then dragging your slider.
Show back Edge
In addition to using the X-Ray mode tool, you’ll also use the “Show back edges” function to feature more of a light line overlay wherever you’ve got edges behind your shape. This function doesn’t really turn your face transparent, so my assumption is that it’s just a lighter weight. One among the great things about this is often that you simply can use the sides to infer from albeit they’re blocked by faces.
The other set of options is all about changing the way that your faces look within SketchUp. Unlike the X-Ray/ Show Back Edges options that you simply can activate or off, you’ve got to possess one among these options selected – you cannot turn them off by clicking once or twice.
Wireframe Mode
The first option puts you in wireframe mode, where your faces in your model don’t show up in the least, only your line work.
Hidden Line Mode
The second puts you in hidden line mode, where only your lines and faces show up, but there is no colouring or shading on your faces. This mode is great for previewing shadows.
Shaded Mode
The third option is the shaded mode, meaning that your model will show colours, but not textures, so any textured face will just be shaded – the image files for the textures won’t be loaded.
Full-on Texture Mode
The fourth option is full-on textured mode – all of your textures and texture image files will load with this setting.
Monochrome Mode
The last option puts you in monochrome mode. This mode basically just shows your faces shaded by front and back faces, so you’ll see which faces have the front side facing outward, and which of them have the rear side facing outward. This mode is extremely useful for checking face orientation in your model.
Note that you simply can adjust the colour of your front and back faces within the styles section of your tray.